Wednesday, July 25, 2012

Ferrari 641/2 4

The exit of the exhaust on the 641 is in the diffuser. The kit only provided 2 rectangular photo-etched plates with an oval indent in the middle for people to paint it black to pretend to be the exhaust outlet. They are in the bottom of the car and no one can possible see them. But then, I still took the effort to open the hole up. Who would have thought that my former job of corotron and scorotron design and prototyping them came handy? I used to fabricate the screens by cutting small opening on stainless steel sheet metal. Corotrons and scorotrons are electrostatic chargers usually used in xerographic application before Canon came up with a better way of laying down a coat of electrostatic charge to a photoconductor using primary charge roller. Getting confused? 

The picture shows 1 with 2 oval openings on the left and the stock one on the right. I'll work on the other one tomorrow.


Also put together the wheels.

Tuesday, July 24, 2012

Preparation

Disclaimer: the Haynes Manual for RB6 and the bottle of Red Bull Blue Metallic paint has nothing to do with the box that reads Green Rabbit. *wink* *wink* :)


No, Haynes did not print a manual that teach people how to fix the Red Bull Racing RB6. But it has a lot of nice close up picture of different parts of the car that won the 2010 title. Good reference book to have.

Monday, July 23, 2012

Ferrari 641/2 3

Seeing red!


Primed and sprayed a nice coat of red. Could have painted the bottom, the wing and all those suspension pieces, but I got lazy. Well, there is no need to rush things through. This is supposed to be a hobby, not work. There is no deadline to meet. Now I am going to sit back, watch TV and drink a bottle of soda. 

Saturday, July 21, 2012

Ferrari 641/2 2

I did not usually test fit anything first in the old days when I was building plastic injection kits. That is because injection kits usually can fit quite well out of the box. The problem with these 1/43 white metal cast kits is, they do not fit together well. Parts often need modifications. I did not test fit parts when I built the first couple of 1/43 kits, and I had a lot of trouble fitting the suspension pieces to the body. Test fitting parts, make sure they fit together and getting an idea how they should fit together is very very important. Spending more time up front test fitting things will keep me from a lot of headaches and frustrations down the road.

I made pretty good progress last night and today. Got the transmission fitted with drive shaft and rear suspension. Also, the rear wing is put together. I suppose I can start painting pretty soon.


Ferrari 641/2 1

One thing I've learned is the importance of test fitting all the suspension pieces. 


I have a feeling that this one will be a quick build.

Friday, July 20, 2012

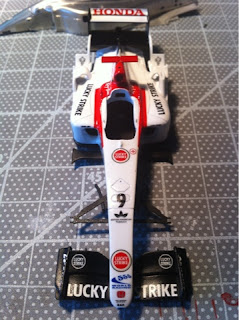
BAR 006 Complete

BAR Honda 006
Japanese G.P. 2004 P3
Jenson Button
Tameo Kits (SLK 015)


Sunday, July 15, 2012

Ferrari 641 French G.P. 1990 Alain Prost

At the rate that I build these kits and the rate that I have been buying them, I will never be able to finish all of them. So, right after I'm done with BAR 006, I have to start my next project.

The next project is Ferrari F1-90, more commonly known as 641. The kit TMK 375 is the French G.P. version which the Professor, Alain Prost, scored Ferrari's 100th Grand Prix win.


Hopefully, it won't take me 5 months to finish this guy.

Also, I just bought the kit of the car that won Ferrari's 200th Grand Prix win. It is F2007 at Chinese G.P., piloted by the Iceman, Kimi Raikkonen.

BAR 006 17

Done! Done! Done! Now I only need to mount it in the display case. 5 months of work (could have finished 2 month earlier, but thanks to the decal incident which set me back 2 months).


BAR 006 16

Very very close to finish. I can see the end of the tunnel now.

Friday, July 13, 2012

Animals and Ferrari Red

Guess what I got?


My animals from Italy are here! A 2 year old Green Rabbit and a 1 year old blue parrot! Sorry Black Bison, 3 years ago, you were not good enough in 2009 to deserve the WC name, and you will not be in my collection.

Now that I am winding up the BAR 006, I guess I should finish the Ferrari 641 first and then decide what should I build afterward. My current project at work will come to a conclusion by the end of next week and I do not have anything lined up yet. So, I will probably have some extra time to play with model cars.

Going back to the Ferrari 641. Which red is the correct red for the car? On TV and on photographs, the car is just red. But in real life, Ferrari F1 machines that I have seen were not exactly red. F310, F399 and F2000 that I've seen looked like they are in fluorescent red with a hint of orange. So, anyone has any idea which red Ferrari 641 is supposed to be in?

Sunday, July 8, 2012

BAR 006 15

Front and rear suspension done! Also put in the seat, the racing harness.


Saturday, July 7, 2012

BAR 006 14

Mr. Hobby Mr. Super Clear did not burn the decal! Dry time is pretty fast also. Now, I'll just let it sit and get fully cured and hardened.Bye bye Tamiya TS-13, you are going to the trash can.


Now it is time to focus on other parts of the car.

Thursday, July 5, 2012

BAR 006 13

One step closer. I'll let the decal dry for at least a day before I spray the clear coat.


Still have a long way to go. 

Update 1 (7/6/2012):
First mist coat of clear on, testing my patience. And pray that the decals will survive.

Wednesday, July 4, 2012

Thank you Mr. Hobby

Last time, when the decals got burned by Tamiya TS-13, it was 2 months ago. Now the decals should be done pretty soon, I have to make sure I won't repeat the same mistake. This morning, I put a couple of decals on the spare body, quickly dried them using a blow dryer, I sprayed a wet coat of Mr. Hobby Mr. Super Clear Gloss over the decal. It completely cured in 4 hours. Dried to touch and most importantly, did not burn the decal! I think it is safe to say this clear coat should be safe. I'll still start with light coats, allowing each coat to dry before a wet coat, just to be on the cautious side. After all, I don't have another set o decal for the BAR 006.

Tuesday, July 3, 2012

BAR 006 12

No work travel for the week, so resuming work on the BAR 006, but at glacial speed. Only managed to put on a couple of decals and touched up the "red" that the decal couldn't cover. 

Originally, I just used Tamiya X-7 gloss red for the tip of the air-box and the little area underneath it, but when the decal was dried, it turns out the red on the decal has a slight tint of orange. Not noticeable in photographs, but it was quite obvious with naked eye. So, I mixed the red with a bit of orange (Tamiya X-6) and tried to match the color as close as I can.


I don't think the progress of this project is going to speed up any time soon. Sorry brother, the Porsche 935 that I promised you may have to delay a bit.

Already started thinking about the next project. Even though I've already started working on the body of the Ferrari 641, the plan may change. I really want to build the McLaren MP4/22 and MP4/23 just to try out the Alclad II chrome stuff. On the other hand, I also want to build the RBR RB6 or Honda RA300. Sigh... problem of having too many interesting kits.

Sunday, July 1, 2012

Holy Crap!

The BAR 006 project is idled. Partly because I was on vacation and was too busy doing other stuff.
When production is stopped, but purchasing is still going on, the net result is an increase in inventory. In the past couple of weeks, I bought these:
1967 Honda RA300 SRC kit
1976 Tyrrell P34 - Tameo made 3 versions of the 1976 car, the Dutch GP version with a different nose, the Japanese GP version with the roof like thing above the air funnels of the DFV engine. The version that I bought is the Swedish GP version that looks the same as the old Tamiya kit that I put together when I was in second grade.
1987 Williams FW11B - I bought another TMK version and the WCT. The price was just too good to pass. $40 for the TMK and less than $75 for the WCT! I had a TMK version of the FW11B in stock already, but the seller of that kit already started some assembly on that one. This one is brand new and I am going to use the other one as a back up. 2010 Red Bull Racing RB6 - this is by far the biggest find so far. Due to licensing issue, the kit is actually called Green Rabbit. I have been trying to track one down since I learned of its existence. When I saw it listed and it was a "Buy it now" item, it's a no brainer.